Crestron Integration
Integrating Barix Annuncicom devices with Crestron touchpanel systems
IMPORTANT: this solution is now OBSOLETE and not supported anymore.
Introduction
The Annuncicom 100-CS is a custom audio over IP intercom solution developed collaboratively between Crestron and Barix, to enable easy integration of audio into residential control applications. The Barix Annuncicom 100-CS enables streaming IP intercom communication between Crestron Isys i/O™ WiFi touchpanels, and also provides seamless integration with Crestron IADS analog intercom systems. What Crestron devices supported, what Barix? The Annuncicom 100-CS is a Barix Annuncicom 100 with a special firmware loaded that communicates with Crestron control systems for analog audio and digital IP intercom applications, delivering point-to-point distribution of full-duplex audio between TPMC-8X, TPMC-8T and TPMC-8L touchpanels. Barix Audio over IP technology also enables integration of new digital IP intercom solutions with existing IADS analog intercom systems, providing a flexible, cost-effective digital upgrade path. Connect one or more Barix Annuncicoms to a C2N-IADS30x24 to enable seamless intercom communication between a digital Crestron touchpanel and an analog Isys® touchpanel.
How do I load the An100-CS firmware into an Annuncicom 100?
This process details the steps required to upload the Crestron specific application into a Barix Annuncicom 100 using the web update method.
Procedure:
1. First obtain the file crestron_yyyymmdd.zip[1] from the Barix website, and then extract the application using a tool such as WinZIP. This will create a folder 'CrestronYYYYMMDD', containing a file 'compound.bin'.
2. Access the Annuncicom's web UI, by typing its IP address into the URL field of your browser and pressing <ENTER>.
3. Click on the UPDATE button to enter the update page.
4. Click on "Please click here to continue" to launch the update process. The device will restart in a special mode called Bootloader, showing a number counting down
(4-3-2-1).
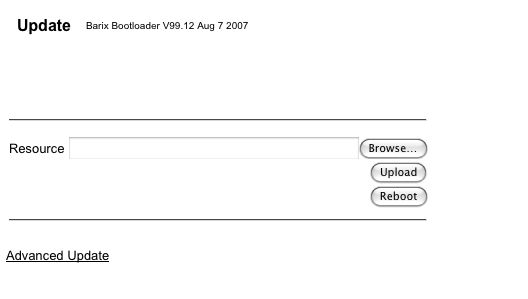
The following screen appears when the device is ready for the update process:
5. To update the device with the application, click on "Browse" to locate the file that you want to upload; in this case, this is the file 'compound.bin', located in the CrestronYYYYMMDD folder.
6. Once the file has been selected, click on "Upload" to start the transfer of the file to the device. This can take a few minutes. After a successful upload click on the "update" link and when the Update window reappears click the "Reboot" button. If there is no button, click on Browse and select the "reboot". The device will reboot with the new application.
7. Press and hold the Annuncicom's Reset button for approximately 10 s, to restore factory defaults. The device is now loaded and ready for configuration.
Configuring the Barix and Crestron devices to work together
The following documents explain how to set up the Barix and Crestron devices so that they work together:
[Crestron IP Intercom Quick Install: Page 1][2]
[Crestron IP Intercom Quick Install: Page 2][3]
[Crestron Protocol v1.1][4]
These pages explain how to use the Barix devices to add IP Intercom functionality to the Crestron products.
Related Links:
Back to Main Page#Applications

